


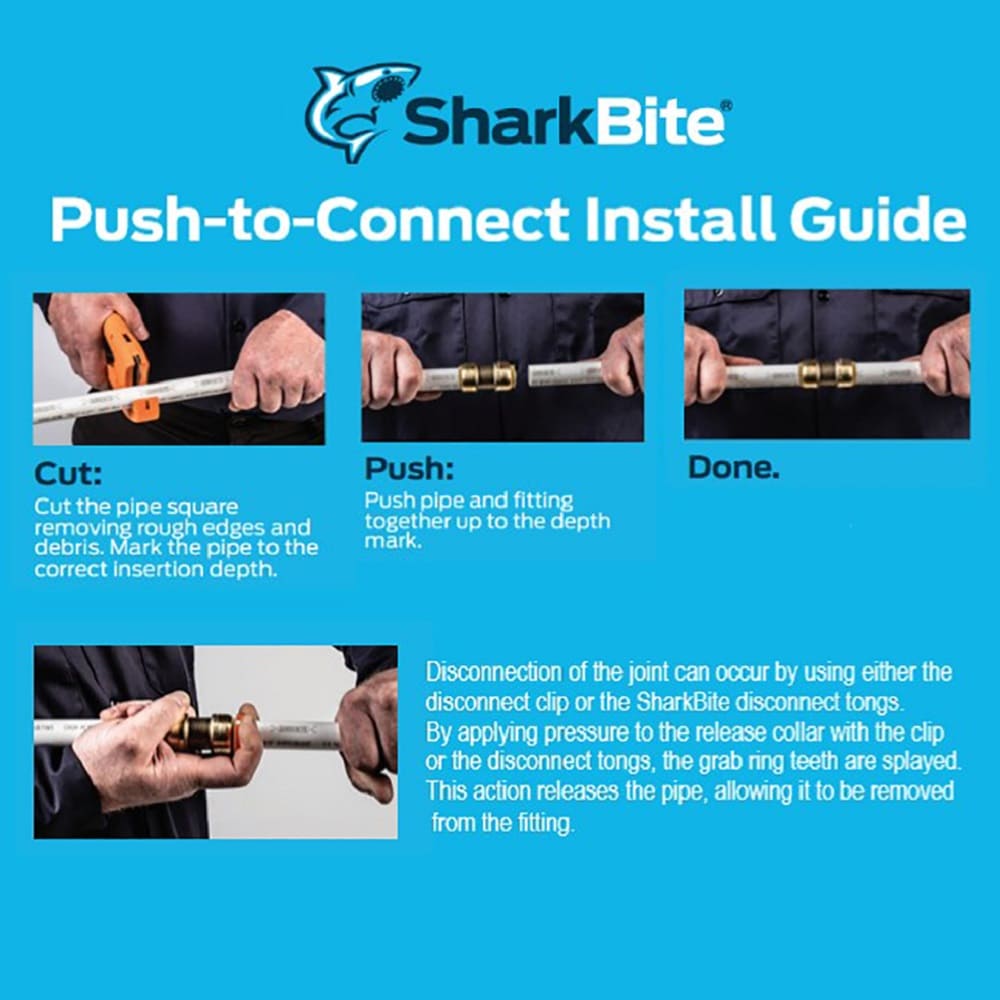
To remove a Sharkbite fitting, simply depress the release collar with a special disconnect clip or tong and pull the pipe out. Ensure the pipe is stable before attempting removal.
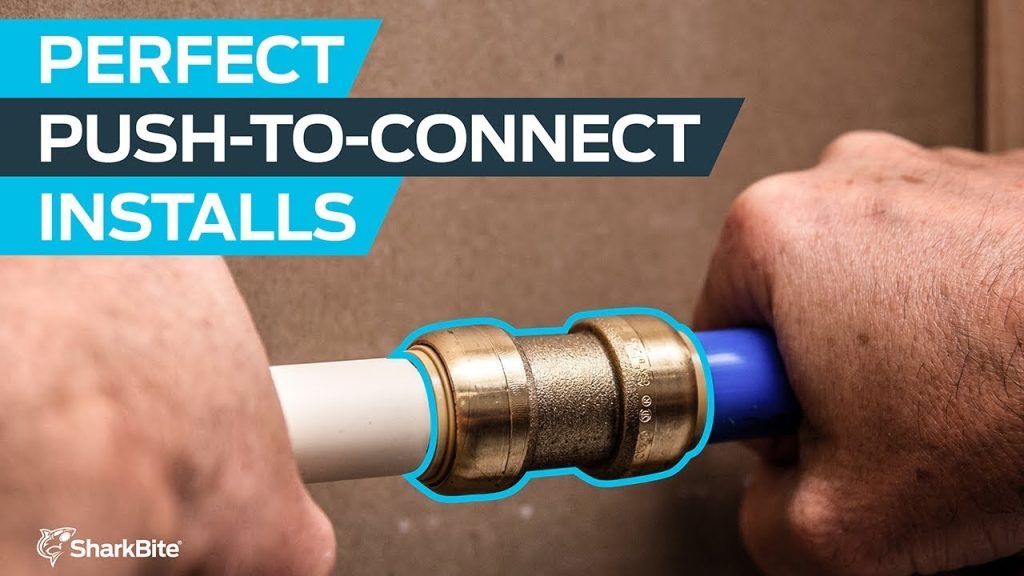
Dealing with plumbing can often lead to unexpected challenges, but removing a Sharkbite fitting isn’t one of them. These fittings are designed for easy, tool-free connections in plumbing systems, yet sometimes they need to be detached for adjustments or replacements.
Despite the simplicity of the process, knowing the proper steps ensures a smooth and damage-free removal. DIY enthusiasts and professionals alike find Sharkbite fittings convenient, as they reduce installation time and require no soldering. Whether you’re rerouting pipes or making repairs, understanding how to correctly disconnect these fittings is a valuable skill. It is important to handle the fittings and pipes with care to maintain their integrity for future use.
Introduction To Sharkbite Fittings
Sharkbite fittings have revolutionized plumbing projects for professionals and DIY enthusiasts. These push-to-connect joints make installation and repairs quick and effortless.
The Design And Purpose Of Sharkbite Fittings
Sharkbite fittings offer a unique solution for connecting pipes. They eliminate the need for soldering, clamps, or glue.
- They consist of a compression mechanism with teeth and an O-ring.
- Designed for versatility, they fit copper, CPVC, and PEX pipes.
- User-friendly, they facilitate easy installation and removal.
Why And When To Remove A Sharkbite Fitting
Situations may arise where removing a Sharkbite fitting is necessary. Common reasons for removal include:
| Reason for Removal | Description |
|---|---|
| System Repairs | Fixing leaks or damaged pipes. |
| Alterations | Changing the layout or upgrading the system. |
| Inspection | Checking internal components for wear. |
The process is straightforward, requiring just a few simple steps and tools. Knowing the correct procedure ensures fittings are removed without damaging pipes or fittings.
Credit: www.lowes.com
Required Tools And Safety Precautions
Removing a Sharkbite fitting can be a simple task with the right tools and safety measures. Effective removal ensures a clean, reusable pipe and fitting for future plumbing endeavors. To achieve the best results, you must have the proper equipment at hand and follow safety protocols to prevent any mishaps.
Tools Needed For Removal
Gathering the appropriate tools is crucial. Ensure you have the following before starting:
- Sharkbite Removal Tool: This tool is specifically designed to disconnect the fitting from the pipe.
- Adjustable Wrench: Useful for grips and extra leverage if necessary.
- Pliers: To hold the fitting securely.
- Towel or Bucket: To catch any residual water from the pipes.
- Gloves: To protect your hands.
Safety Measures Before Starting
Safety measures are paramount. Adhere to the following precautions:
- Turn Off Water: Shut off the water supply to avoid spills.
- Release Pressure: Open the faucet to drain remaining water and release pressure.
- Check Temperature: Ensure pipes are cool to prevent burns.
- Clear Area: Remove any objects that may obstruct your work or pose hazards.
- Wear Protective Gear: Don safety glasses and gloves to safeguard against injury.
Step-by-step Removal Process
Removing a Sharkbite fitting might seem daunting, but fear not. With the right tools and techniques, you’ll have that fitting off in no time. This guide provides a straightforward process for any DIY enthusiast looking to tackle this task.
Inspecting And Accessing The Fitting
Before diving into the removal, ensure you have a clear workspace. Follow these steps to prepare:
- Shut off the water supply to prevent any accidental leaks.
- Clear the area around the fitting for easy access.
- Check the fitting to confirm it’s a Sharkbite brand.
Releasing The Sharkbite Fitting
The beauty of Sharkbite fittings lies in their simplicity. To remove one:
- Slide the disconnection clip or compression tool over the fitting.
- Press against the release collar using the tool.
- Pull the pipe while holding the tool in place.
Tips For Stubborn Fittings
Sometimes fittings can be a bit uncooperative. Try these tips:
- Twist the fitting gently as you pull.
- Apply heat to expand the fitting slightly.
- Ensure the tool is a snug fit for the release collar.
Note: Always wear protective gear and follow safety guidelines.

Credit: www.amazon.com
Troubleshooting Common Issues
Troubleshooting Common Issues with Sharkbite fittings can seem daunting. Fret not! We’re diving into the most common snags people face and how to fix them. Whether you’re dealing with damaged pipes or tight spaces, we’ve got the solutions you need.
Dealing With Damaged Pipes
Encountering a damaged pipe when removing a Sharkbite fitting? Remain calm. Here’s how to proceed:
- Inspect the pipe closely for cracks or splits. Identify visible damage.
- Cut out the damaged section with a pipe cutter, ensuring a smooth edge.
- Measure and prepare a new piece of pipe to replace the damaged one.
- Reinstall the Sharkbite fitting onto the fresh pipe section securely.
Solutions For Tight Spaces
Tight spaces can make fitting removal tricky. Here’s a compact guide:
- Use a Sharkbite disconnect clip or tong. Position it correctly around the fitting.
- Apply pressure inward on the release collar while pulling the pipe free.
- Toggle the pipe back and forth if it’s stubborn. Patience is key.
In extremely tight spots, a specialized Sharkbite removal tool is your best ally.
| Problem | Tool Required | Action |
|---|---|---|
| Damaged Pipe | Pipe Cutter | Cut and Replace |
| Tight Space | Disconnect Clip/Tong | Clip, Press, and Pull |
With these methods, Sharkbite fitting removal becomes a breeze, even in less-than-ideal situations.
Post-removal Steps
Once you successfully remove a Sharkbite fitting, follow key steps to ensure everything is in order. This includes checking for any leaks, disposing of the old fittings properly, and preparing the pipe for potential reuse. Adhering to these steps will prevent future issues and maintain the integrity of your plumbing.
Checking For Leaks
After removal, it’s crucial to check for leaks.
- Wipe the pipe dry.
- Turn the water back on.
- Inspect the pipe and fitting area.
- Look for any water droplets forming.
- If dry, no leaks are present.
A leak-free pipe ensures a job well done.
Proper Disposal Of Old Fittings
Dispose of old fittings responsibly.
- Separate the plastic and metal parts.
- Recycling facilities take metal parts.
- Check local guidelines for plastic.
Proper disposal helps the environment.
Preparing The Pipe For Reuse
Prepare the pipe before fitting a new connection.
| Step | Action |
|---|---|
| 1 | Clean the pipe’s end. |
| 2 | Use a deburring tool if necessary. |
| 3 | Ensure no debris remains. |
| 4 | Check the pipe is not damaged. |
A clean, debris-free pipe is ready for a new fitting.
Maintenance And Care For Sharkbite Fittings
Keeping your Sharkbite fittings in top shape ensures longevity and efficiency. Simple steps can help avoid leaks and maintain the integrity of your connections. Remember, a well-maintained fitting is a reliable one.
Regular Inspection
Consistent checks are key to Sharkbite fitting care. Look out for signs of damage or corrosion. Establish a routine to examine your fittings periodically. This can prevent unexpected issues. Boldly highlight any abnormalities for further action.
- Check for cracks or wear
- Ensure no water leaks are present
- Observe if fittings remain firmly secured
Proper Installation Techniques
Correct installation guarantees optimal performance. Follow the manufacturer’s guidelines strictly. Use the right tools for secure connections. Avoid applying excessive force which can damage the fittings.
| Step | Action |
|---|---|
| 1 | Cut the pipe cleanly |
| 2 | Deburr and clean the pipe end |
| 3 | Push the fitting onto the pipe |
| 4 | Ensure it’s fully seated |
When To Replace Instead Of Remove
Sometimes, removing a Sharkbite fitting isn’t the best option. Look for signs that necessitate replacement, rather than reusing an older fitting. If a fitting shows significant wear, has been used multiple times, or holds any damage, consider a new one to maintain system integrity.
- Evaluate the condition of the O-ring
- Inspect the gripping teeth for signs of wear
- Assess the overall fitting for fatigue

Credit: www.amazon.com
Frequently Asked Questions Of How To Remove Sharkbite Fitting
How Do You Release A Sharkbite Fitting?
To release a SharkBite fitting, push the release collar fully with a SharkBite disconnect clip or tong. Then, pull the pipe out firmly while holding the fitting steady.
How Do You Remove A Sharkbite Fitting Without Special Tool?
To remove a SharkBite fitting without a special tool, use an adjustable wrench to press the release collar while simultaneously pulling the pipe out. Ensure firm pressure to disengage the fitting for a successful removal.
Are All Sharkbite Fittings Removable?
Yes, all SharkBite fittings are designed to be removable with a specific disconnecting clip or tool.
How Do You Remove A Sharkbite Shut Off Valve?
To remove a SharkBite shut-off valve, first ensure the water supply is off. Use a SharkBite disconnect clip or tong to press the release collar. Then, firmly pull the valve off the pipe.
Conclusion
Removing a Sharkbite fitting doesn’t need to be a daunting task. With the right tools and a steady hand, you can tackle the job easily. Remember, a firm push and a proper twist are key. Keep practicing and soon, it’ll be just another quick step in your plumbing projects.
Good luck and stay dry!


