


To remove a cast iron toilet flange, first, shut off the water and drain the toilet. Then, unscrew and lift out the flange from the surrounding flooring.
Removing a cast iron toilet flange might seem daunting, but it’s a task well within the reach of most DIY enthusiasts. Before starting, it’s crucial to have the right tools and safety gear. Ensuring the job is done correctly prevents potential leaks that could cause significant damage to your bathroom floor.
Whether you’re replacing an old flange or preparing for a complete bathroom renovation, understanding how to tackle this process is essential. The focus here is on clear, straightforward steps to help you remove the flange efficiently, without getting bogged down by unnecessary details. Below, you’ll find a guide that cuts through the complexity, providing the information you need to proceed with confidence.
Introduction To Cast Iron Toilet Flange Removal
Replacing a toilet requires dealing with the flange that connects the toilet to the drainpipe. Cast iron toilet flanges, often found in older homes, present a unique challenge. This post guides homeowners through the removal process, step-by-step, to prepare for a new installation.
The Role Of A Toilet Flange
The toilet flange serves as a critical link between your toilet and the home’s waste disposal system. It securely anchors the toilet to the floor and connects to the drainpipe. Understanding its function is key to successful removal.
Reasons For Removing A Cast Iron Flange
- Corrosion: Over time, cast iron can corrode, leading to leaks and weak spots.
- Remodeling: Bathroom upgrades may require flange replacement.
- Damage: Cracks or breaks can compromise the seal and stability.

Credit: www.pmmag.com
Preparation And Safety
When tackling the removal of a cast iron toilet flange, preparation and safety must take priority. These steps ensure the job gets done without damaging the bathroom or causing any injuries.
Tools And Materials Needed
Gather these tools and materials before starting:
- Wrench or pliers: For loosening nuts and bolts.
- Screwdriver: To remove screws from the flange.
- Hammer and chisel: For breaking away the old flange if necessary.
- Hacksaw or reciprocating saw: To cut the flange if it doesn’t come off easily.
- Shop vacuum: To clean debris from the work area.
- Pipe cutter: If you need to trim the pipe.
- Replacement flange and bolts: For installing a new flange.
- Trash bags: For disposing of the old flange.
- Cleaning supplies: To clean the area before installing a new flange.
Securing The Work Area
Prepare the work area with these steps:
- Turn off the water supply to the toilet.
- Flush the toilet to empty the tank and bowl.
- Mop up any remaining water.
- Cover surrounding areas to protect from dust and debris.
- Ensure the work area is well-lit.
- Keep tools and materials organized for easy access.
Personal Protective Equipment
Wear the following to stay safe:
- Safety goggles: Protects eyes from dust and debris.
- Work gloves: Keeps hands safe from sharp edges.
- Dust mask or respirator: Prevents inhaling harmful particles.
- Ear protection: If using loud tools.
- Steel-toed boots: Protects feet from falling objects.
Assessing The Flange Condition
Before you dive into removing a cast iron toilet flange, take time to examine its condition. A thorough assessment guides your next steps, ensuring that you deal with the flange effectively. Checking for rust, cracks, and wear is crucial. It determines whether you’ll simply repair or go for a full replacement.
Identifying Rust And Damage
Start by checking the flange for visible signs of rust and damage. Look for discoloration, flaking, or brittle areas that indicate corrosion. Bear in mind, a flange weakened by rust compromises the toilet’s stability and can lead to water damage.
Inspect closely for cracks or breaks, especially around the bolts that secure the toilet. Use a flashlight to enhance visibility. Small cracks can turn into big problems if not addressed early.
Deciding On Repair Or Replacement
- Evaluate the extent of the damage.
- If damage is superficial, cleaning and minor repairs may suffice.
- Measure the flange size to match with a new one if replacement is necessary.
- Choose a repair or replacement based on the flange’s overall integrity.
A stable flange means a repair job might be enough. But, a flange with extensive damage calls for replacement to prevent future issues.
Removing The Toilet
Getting ready to tackle a cast iron toilet flange? First, remove the toilet safely. This step-by-step guide ensures you do it right, without any mess or fuss. Equip yourself with the necessary tools and follow the below instructions for a smooth removal process.
Draining And Disconnecting
Start by shutting off the water supply. Locate the valve behind the toilet and turn it clockwise.
Flush the toilet. This empties the tank and bowl. Use a sponge to sop up any remaining water.
Disconnect the water supply line from the tank. A pair of adjustable pliers comes in handy for this step.
Now remove the tank lid and set it aside in a safe place. This prevents damage.
- Unscrew bolts connecting the tank to the bowl, if necessary.
- Remove the tank and place it gently on a towel or mat.
For one-piece toilets, skip tank separation and prep the whole unit for lifting.
Lifting And Storing The Toilet
Removing the main toilet body is next. Caps often hide bolts on the toilet base. Remove these caps.
Unscrew the bolts. If they don’t budge, apply penetrating oil. Allow it to seep in before trying again.
Lift the toilet straight up to avoid damaging the flange underneath. Enlist help if necessary.
Place the toilet on a towel or newspaper. This keeps the area clean and protects the floor.
- Stuff a rag into the sewer opening. This blocks gases and prevents objects from falling in.
- Check the condition of the existing flange. Gauge if it needs a full replacement or a simple repair.
Clean the area where the toilet was seated. Ensure it’s clear of old wax and debris for a fresh seal.
Extracting The Cast Iron Flange
Ready for a plumbing update? Removing a cast iron toilet flange is a big step. Find out how to do it right with this guide. It’s a DIY task you can tackle with the right tools and guidance.
Cutting The Flange
Begin by cutting the flange from the surrounding pipe. A reciprocating saw works best. Fit it with a metal-cutting blade. Wear safety glasses and gloves. Take care to make a clean cut without damaging pipes.
Do these steps:
- Prepare the area: Clear any debris.
- Locate the flange: Identify where to cut.
- Safety first: Gear up with protective equipment.
- Start cutting: Use steady movements to slice through.
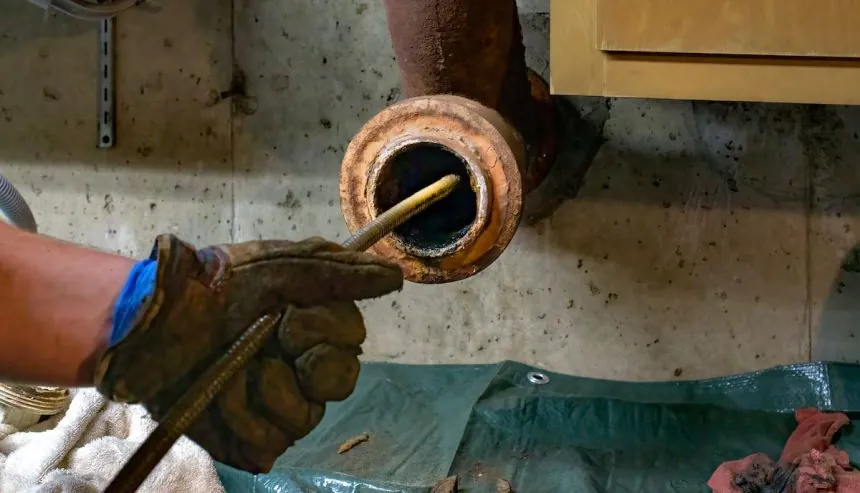
Chipping Away The Material
Next, remove the remaining flange pieces. A cold chisel and hammer do the job. Chip away carefully to prevent pipe damage. Take breaks to avoid fatigue.
Follow this process:
- Position the chisel: Aim right at the flange edges.
- Tap gently: Use the hammer to chip the iron bit by bit.
- Keep it clean: Brush away debris as you work.
- Inspect often: Check for unnoticed damage.
Cleaning The Installation Area
Last comes a thorough cleaning. Make the area ready for a new flange. Scraping and vacuuming remove rust and old putty. Aim for a smooth, clean surface.
Complete these actions:
| Step | Action |
|---|---|
| 1 | Scrape: Use a putty knife for remaining residue. |
| 2 | Vacuum: Clear all the small debris and dust. |
| 3 | Wipe: A damp cloth picks up the last bits. |
| 4 | Inspect: Ensure a spotless surface. |
Installation Of New Flange
Once your old cast iron toilet flange is out, the next step is straightforward. Install your new flange correctly to avoid any future toilet troubles.
Selecting A Replacement
Choosing the right flange is crucial. Consider the material and size.
- PVC or ABS flanges – Great for most modern plumbing.
- Cast iron flanges – Ideal for older homes maintaining original plumbing.
- Size – Match it with the existing pipe for a perfect fit.
Always measure your pipe diameter before purchasing a new flange.
Securing The New Flange
Position the flange carefully onto the drainpipe. Ensure it sits flush with the floor.
Use closet flange bolts to secure the flange in place. Tighten them evenly.
| Step | Action |
|---|---|
| 1 | Align flange with drainpipe. |
| 2 | Insert closet bolts. |
| 3 | Tighten bolts in an X pattern. |
Silicone sealant can be applied for extra protection.
Testing For Leaks And Functionality
Before finalizing the installation, a leak test is essential.
- Fill the drainpipe with water. Watch for leaks.
- Check the flange for movement. It must be stable.
- Attach the toilet to the flange. Ensure a snug fit.
Confirm flush operation is seamless and there’s no water escape.
Finishing Up
With the old cast iron toilet flange out of the way, it’s time to complete the task. You’re close to restoring your bathroom to full functionality. Below, we detail the steps to reinstall the toilet properly and share essential maintenance tips. Let’s wrap this up so you can enjoy a leak-free and sturdy toilet once more.
Reinstalling The Toilet
Preparation is key. Verify that the new flange is securely in place. Ensure the following steps are followed for a successful toilet reinstallation:
- Position the new wax ring over the flange.
- Lower the toilet onto the flange, aligning the bolt holes.
- Press down to seal the wax ring.
- Hand-tighten the nuts onto the bolts.
- Use a wrench to secure them evenly, avoiding over-tightening.
- Reconnect the water supply and test for leaks.
Final Checks And Maintenance Tips
Perform these final checks to ensure your toilet is ready for use:
| Check | To-Do |
|---|---|
| Flush Mechanism | Flush the toilet to verify proper operation. |
| Leaks | Inspect for water around the toilet base and tank. |
Follow these maintenance tips to prolong the life of your toilet:
- Avoid chemical drain cleaners, which may corrode pipes.
- Twice a year, check the flange for signs of wear.
- Keep the bolts tightened, but not overly so.
Regular checks and mindful maintenance keep your toilet in top shape. Congrats on successfully removing and replacing your cast iron toilet flange!

Credit: www.pmmag.com
Credit: www.puroclean.com
Frequently Asked Questions For How To Remove Cast Iron Toilet Flange
Can I Replace A Cast Iron Toilet Flange With Pvc?
Yes, you can replace a cast iron toilet flange with PVC. Ensure compatibility and use appropriate PVC glue and primer for a secure fit.
How Do You Remove An Original Toilet Flange?
Turn off the water and flush the toilet to drain. Unscrew bolts connecting the flange to the floor. Gently rock the flange to break the seal. Lift the flange out. Clean the area before installing a new flange.
How Much Does It Cost To Replace A Cast Iron Toilet Flange?
Replacing a cast iron toilet flange typically costs between $150 and $300. Price varies based on local labor rates and the complexity of the job.
Can You Put A New Toilet Flange Over An Old One?
Installing a new toilet flange over an old one is not recommended. Instead, you should remove the old flange and replace it with a new one for a proper seal and fit.
Conclusion
Wrapping up, removing a cast iron toilet flange can seem daunting at first. Yet, with the right tools and steps, it’s a manageable task. Remember, patience and precision are your allies in this DIY project. Take it slow, follow safety precautions, and your bathroom will be ready for updates in no time.
Happy renovating!


