


To fix a warped cabinet door, initially, determine the warp direction and apply counter pressure. You can straighten it using humidity control, clamping strategies, or by sanding.
Warped cabinet doors can disrupt the look and functionality of your kitchen or storage spaces. Fixing this common issue not only improves the aesthetics but also ensures the longevity of the cabinets. Warped doors arise from environmental factors such as moisture and temperature, or from poor material quality or installation.
By tackling this issue promptly, you can maintain the sleek appearance and operational efficiency of your cabinetry. The key is to identify the specific type of warp and address it with the appropriate method, which might include adjustments to the cabinet’s humidity, strategic application of pressure, or leveling the door through careful sanding. Regular maintenance and swift action can prevent this minor inconvenience from becoming a persisting problem.

Credit: diy.stackexchange.com
Introduction To Warped Cabinet Doors
Imagine a perfect kitchen, where every cabinet door fits snugly. Suddenly, one door sticks out like a sore thumb.
It doesn’t sit right. That’s a warped cabinet door. It can throw off the look of your kitchen and make it hard to use your cabinets.
Fixing a warped door brings back the fit and function to your kitchen. Let’s find out what causes warping and how to spot it.
Common Causes Of Door Warping
- Moisture: Excess dampness or humidity makes wood swell.
- Temperature Changes: Heat can cause the wood to expand and contract.
- Poor Material: Low-quality wood is more prone to warping.
- Improper Storage: Laying doors flat without support can lead to warping.
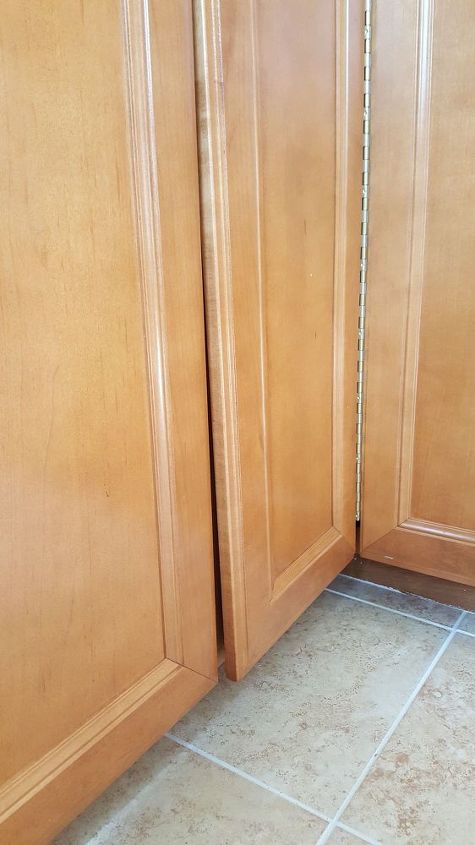
Signs Your Cabinet Door Is Warped
Recognizing a warped cabinet door early is key. Here’s what to look for:
| Sign | Description |
|---|---|
| Uneven Gaps | Spaces around the door don’t match up. |
| Difficulty Closing | Door doesn’t close easily or completely. |
| Visible Bending | Sides of the door look curved or bent. |

Credit: rtaoutdoorliving.com
Assessing The Damage
Assessing the Damage to your warped cabinet door is the first step to restoration. By carefully evaluating the extent of the warp, you can determine if a simple fix will do or if a more intricate approach is necessary. This early assessment saves you time and ensures the proper repair process is selected for optimal results.
Tools You’ll Need For The Job
Having the right tools on hand streamlines the repair process. Assemble these items before you start:
- Straightedge or Level – To gauge the warp’s extent
- Clamps – For securing the door during repair
- Moisture Meter – To check the wood’s dampness
- Iron and Cloth – To apply heat and moisture when flattening
- Wood Glue – If structural adjustments are needed
Determining The Severity Of Warp
Correctly judge the severity of the warp with these steps:
- Close the cabinet door, observing any gaps or misalignments.
- Place a straightedge or level across the door’s surface.
- Note the largest gap underneath the tool to estimate the warp’s extent.
Small warps might only require minimal adjustments.
Larger gaps could demand in-depth repairs or even replacement.
| Gap Size (inches) | Recommended Action |
|---|---|
| 0 – 1/4 | Minor adjustments |
| 1/4 – 1/2 | Moderate repair |
| 1/2+ | Professional assessment |
Diy Solutions For Minor Warping
A slight warp in your cabinet door does not mean the end of its life. With simple tools and patience, you can fix the minor warping. These DIY solutions help straighten out those bent corners and uneven edges. Let’s bring those doors back to their original glory without calling a professional.
Using Heat And Moisture
Heat and moisture can work wonders on warped wood. Follow these steps:
- Dampen a cloth with hot water.
- Place it over the warped area of the door.
- Cover with a dry towel to retain moisture.
- Use an iron on a medium setting, press over the towel.
- Keep checking to avoid excess moisture.
Repeat this process until the wood begins to flatten. Be careful not to oversteam, as this can damage the wood further.
Applying Pressure Overnight
After using heat and moisture, applying pressure helps to correct the warp:
- Place the door on a flat surface.
- Layer with heavy objects, like books, across the warped area.
- Leave overnight to allow the wood to settle.
Check the next day to see the improvement. You may need to repeat this process a few times for the best results. Always ensure your doors are dry before doing this.
Advanced Repair Techniques
Over time, cabinet doors can warp and bow, leading to an imperfect fit and unsightly appearance. In the realm of do-it-yourself repairs, advanced repair techniques can restore the functionality and aesthetic of your kitchen or bathroom cabinetry. This section will delve into methods that require a bit more skill and patience but yield professional-looking results.
Stripping And Sanding The Door
Reviving a warped cabinet door begins with stripping off the old finish. Using a chemical stripper, you can remove layers of paint or varnish. Apply the product according to the manufacturer’s guidelines. Then, scrape away the residue with a putty knife. Ensure complete removal for a clean surface.
Once stripped, sanding comes into play. Sanding evens out any imperfections and prepares the door for treatment. Start with medium-grit sandpaper, then progress to fine-grit for a smooth finish. Sand along the grain to avoid scratches.
Using Clamps And Wood Glue
To correct the warp, wood glue and clamps can work wonders. Spread wood glue on the affected area. Ensure coverage is even for strong adhesion. Use a damp cloth to remove excess glue.
- Align the door to its original shape.
- Place clamps across the door to press it flat.
- Adjust the tension to avoid over-tightening, which could damage the wood.
Allow the glue to set for at least 24 hours. The result is a cabinet door that’s back to its proper form and function.
Preventive Steps For Future Warping
Preventive Steps for Future Warping ensure your cabinet doors stay straight and functional for years to come. It’s not just about fixes; it’s about setting the stage right. By taking the right steps, you’ll dodge future door dilemmas.
Maintaining A Stable Environment
Stability is key in the battle against warping. Wood is like a sponge; it loves moisture. Too much or too little can lead to warping. Keep your home’s humidity levels consistent. Aim for a sweet spot between 40-50% all year round. Remember, sudden temperature shifts are a big no-no. Use humidifiers or dehumidifiers to stay in control.
Regular Door Maintenance Tips
Loving care goes a long way. Tighten those hinges every so often. A loose hinge invites trouble, so keep an eye and a screwdriver handy. Clean your doors with a gentle cleaner. Harsh chemicals can harm the wood. Dust them regularly to avoid buildup that could cause sticking or warping. Every month, inspect your doors for signs of stress. Early detection means easy prevention.
- Check hinges regularly – a tight hinge equals a straight door
- Gentle cleaners only – harsh chemicals can damage wood surfaces
- Dust often – clean doors are happy doors
- Monitor moisture – use tools to maintain optimal humidity
Credit: www.hometalk.com
When To Call A Professional
Warped cabinet doors can quickly diminish the look of your kitchen. Sometimes, these can be fixed at home with basic tools and a bit of patience. Yet, not all warps are simple fixes. At times, professional help is essential to restore the form and function of your kitchen cabinets.
Recognizing Irreparable Damage
Inspect the door carefully to determine the severity of the warp. Small bends might be reparable, but certain signs indicate it’s time to call in the pros:
- Cracks in the wood
- Significant twisting
- Thinning or degradation of material
The Cost-benefit Analysis Of Professional Repair
Weighing the cost against the benefit of professional repair often leads to a clear decision. Consider this comparison:
| DIY Repair | Professional Repair |
|---|---|
| Low initial costs | Higher initial costs |
| Risk of further damage | Expert restoration |
| Time-consuming | Efficient and reliable |
Evaluate the situation based on the door’s value and your handyman skills. If the repair seems beyond your scope, a professional provides peace of mind with guaranteed results.
Frequently Asked Questions For How To Fix Warped Cabinet Door
Can You Flatten A Warped Cabinet Door?
Yes, you can flatten a warped cabinet door. Apply gentle pressure with clamps after moistening the warped area, and leave it to dry. Consider using a dehumidifier to stabilize the wood.
Can A Warped Door Be Fixed?
Yes, a warped door can often be repaired. Techniques include adjusting the hinges, sanding, or planing the door, and using tension rods or weights to straighten it.
How Do You Straighten Cabinet Doors?
Tighten loose hinge screws to straighten cabinet doors. Adjust the hinges if the door is still crooked. For persistent misalignment, add a cardboard shim behind the hinge. Regularly check and maintain hinge tightness for best results.
How Do You Straighten A Warped Wooden Screen Door?
Remove the screen door and lay it flat on a surface. Apply moisture evenly to the warped area. Use clamps to gently straighten the wood by applying pressure where needed. Allow it to dry completely before rehanging.
Conclusion
Fixing a warped cabinet door is simpler than you might expect. Use the tips outlined, and restore the beauty of your cabinetry with ease. Embrace the satisfaction of a DIY job well done. Remember, patience and precision are key to a seamless repair.
Ready to tackle the next project?


