


To extend a kitchen island with legs, attach new legs and a support frame to the existing structure, ensuring stability. Choose legs that match your island’s design for a cohesive look.
Extending your kitchen island can significantly enhance the functionality and aesthetic appeal of your space. This project involves selecting the appropriate legs that complement the existing style and securing them firmly to support the extra countertop space. By doing so, not only do you gain additional working surface and seating options, but you also have the opportunity to introduce a fresh design element.
Whether you opt for elegant, turned wood legs for a classic touch or sleek metal ones for a modern vibe, the extension can be customized to suit any kitchen layout. Careful measuring and sturdy construction are key to a seamless integration, transforming your kitchen island into a versatile centerpiece.
Introduction To Kitchen Island Expansion
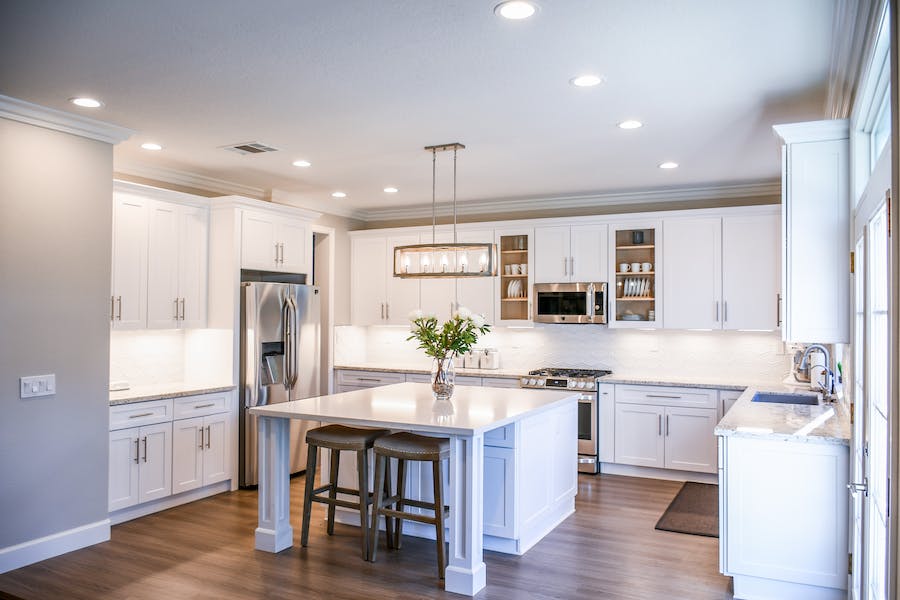
Welcome to the world of kitchen island expansion. As homes evolve, so do the hearts of them – the kitchens. Larger, multifunctional kitchen islands become the focal point for family gatherings and culinary adventures. An expansion can transform your kitchen island from a simple prep area to a robust multipurpose space. Extending with legs not only adds charm but also utility to your kitchen.
The Rising Trend Of Spacious Kitchen Islands
Large kitchen islands now lead the trend in modern home design. They offer ample space for cooking, dining, and entertainment. Homeowners cherish the added work surface and the elegant aesthetic these islands provide. Families view them as an essential element for socializing and engaging with guests.
Benefits Of Extending A Kitchen Island
- Increased Counter Space: Prep and serve meals with ease.
- Additional Storage: Hide your cookware or pantry items.
- Enhanced Functionality: Create room for built-in appliances.
- Improved Aesthetics: Elevate your kitchen’s design.
- Customization: Personalize your space to fit your lifestyle.
Credit: www.ceramictilecenter.com
Materials And Tools Needed
Planning to revamp your kitchen space? Extending your kitchen island not only gives you more space but adds a dash of elegance too. Before getting started, it’s essential to know precisely what materials and tools are required for a successful installation. Here’s a breakdown of everything needed to extend your kitchen island with legs.
Selecting The Right Type Of Legs
Choosing the perfect legs for your kitchen island extension is crucial. Your selection will influence aesthetics and stability. Various options exist, from classic wooden legs to modern metal ones. Consider matching the legs to the existing style of your kitchen for a cohesive look.
- Wooden Legs – Ideal for a traditional or warm appeal
- Metal Legs – Best for modern and industrial designs
- Adjustable Legs – Useful for uneven floors
Essential Equipment For Installation
Having the right tools makes the installation process smooth and efficient. You’ll need a collection of equipment to ensure your kitchen island with legs is installed correctly.
- Measuring Tape – To measure the height accurately
- Saw – For cutting the legs if necessary
- Screwdriver – To secure the legs to the island
- Drill – For precise pilot holes
- Level – To ensure even installation
- Hardware (screws and brackets) – For a sturdy build
- Wood Glue or Epoxy – For added strength
- Sanding Paper – To smooth out the legs
| Tool | Use |
|---|---|
| Measuring Tape | Ensure correct leg height |
| Saw | Cut legs to length |
| Screwdriver | Attach legs securely |
| Drill | Create pilot holes |
| Level | Verify evenness |
| Hardware | Strengthen construction |
| Wood Glue/Epoxy | Reinforce connections |
| Sanding Paper | Smooth edges |
Diligently gathering the materials and preparing the right tools will pave the way for a seamless extension of your kitchen island. With everything on hand, you’re ready to start the transformation.
Preparation Steps
Kickstarting your kitchen remodel? Extending your kitchen island adds valuable space and style. But first, proper preparation is crucial. Follow these steps to ensure a smooth extension process.
Measuring Your Current Kitchen Island
To begin, you’ll need accurate measurements of your existing island. This determines the size of the extension and the materials required. Use a tape measure to record these dimensions:
- Island length and width
- Counter height
- Space available for the extension
Choosing The Ideal Location For Legs
With measurements in hand, decide on the new legs’ placement. Consider these factors for the perfect fit:
- Kitchen traffic flow
- Balance and aesthetic appeal
- Support requirements for the countertop material
Select strong materials that match your kitchen’s style. Position the legs so they support the extension and enhance the island’s functionality.
Leg Installation Process
Embracing functionality and style is easy when extending your kitchen island with legs. This not only adds valuable space but also enhances its aesthetic appeal. The leg installation process is straightforward. Let us walk you through each step, ensuring a stable and stylish outcome for your kitchen island.
Securing The Legs To The Island
A sturdy kitchen island begins with firm leg attachments. Start by choosing the right legs that complement your island’s design. Measure and mark the exact points where the legs will attach to the island base. Use a drill to create pilot holes. These will guide you in securing the legs. Make sure the screws selected are the appropriate length. The screws should penetrate both the leg and the island base but not emerge on the other side.
Align the legs with the pilot holes. Attach them using screws and a screwdriver or a power drill with a screwdriver attachment. Tighten the screws until the leg is snug against the island base. Be careful not to over-tighten, as this may strip the holes or damage the wood.
Ensuring Stability And Levelness
A level island is key for cooking and dining experiences. Once the legs are attached, use a level to check each one. Make small adjustments to the leg height, if adjustable, or add shims under the legs to correct any unevenness. Secure the shims in place either with adhesive or small nails.
Test the stability of your island by applying gentle pressure from different angles. There should be no movement. If any wobble is detected, recheck the tightness of your leg attachments and the levelness of each leg. Now your extended kitchen island should stand tall and stable, ready to host your culinary adventures and family gatherings.
Finishing Touches
Installing your kitchen island legs marks the start of a thrilling phase: the Finishing Touches. This step transforms a mere extension into a stunning piece seamlessly integrated with the rest of your kitchen. Let’s dive into how to ensure that your new kitchen island not only stands strong but also stands out brilliantly.
Countertop Extension Considerations
Before you celebrate your extended kitchen island, remember the countertop needs attention. Choosing the right material and size is crucial. The extension should match or complement the existing countertop.
- Measure accurately: Ensure the new section aligns perfectly with the old.
- Material selection: Go for durability and aesthetics.
- Professional installation: Get an expert for a flawless finish.
These nuances affect functionality and beauty. Pay keen attention to detail to achieve the best results.
Aesthetic Enhancement Tips
The magic is in the details when upgrading your kitchen island. Here are ways to make it visually appealing:
- Color synchronization: Keep the color palette uniform or complementary.
- Add decorative elements: Consider corbels or shapely legs.
- Lighting: Overhead pendants can spotlight the island.
| Element | Recommendation |
|---|---|
| Hardware | Match finishes with other fixtures. |
| Seating | Choose stools that tuck under and complement. |
Every touch matters, from the texture of materials to the hardware finish. Your kitchen island can be a masterpiece of design with thoughtful enhancements.
Maintenance And Care
Maintenance and Care are crucial to ensuring your extended kitchen island not only looks great but also stands the test of time. With the right cleaning habits and upkeep strategies, you can preserve the beauty and functionality of your kitchen centerpiece.
Routine Cleaning Advice
Keeping your kitchen island clean is essential. Start with daily wipe-downs using a soft cloth. For tougher stains, use a gentle cleaner.
- Avoid harsh chemicals that can damage the finish.
- Use coasters for hot dishes to prevent burns or heat marks.
- Immediately clean spills to avoid staining.
Weekly deeper cleans help maintain the luster of your island. Apply a wood cleaner if your island features a wooden top. For stone or synthetic materials, use products recommended by the manufacturer.
Long-term Upkeep For Durability
Long-term maintenance ensures your kitchen island’s longevity. Begin with regular inspections.
- Check the legs periodically to confirm they are secure and stable.
- Reapply sealant on stone surfaces every one to two years.
- Tighten hardware as needed to prevent wobbling or noise.
Consider professional refinishing every few years to address wear and tear. Use furniture pads under your kitchen island legs to protect flooring.
| Material | Cleaning Frequency | Special Care Tips |
|---|---|---|
| Wood | Daily/Weekly | Oil annually to retain sheen |
| Stone | As needed | Use ph-neutral cleaners |
| Metal | Weekly | Polish semi-annually |
Potential Pitfalls To Avoid
Potential Pitfalls to Avoid are crucial when extending a kitchen island with legs. A dream kitchen upgrade can quickly turn into a nightmare without due care. Missteps may lead to wobbly surfaces or unsightly finishes. Learn what traps to sidestep for a flawless expansion of your culinary workspace.
Common Installation Mistakes
- Skipping Measurements: Double-check island and leg specs for a perfect fit.
- Ignoring Level: Use a spirit level to prevent a tilted extension.
- Forgetting to secure legs: Ensure legs attach tightly to the island to avoid wobbling.
- Overlooking Material Compatibility: Match woods or metals for a cohesive look.
- Imprecise Cuts: Measure twice, cut once to ensure clean, straight edges.
Troubleshooting Tips For Diy-ers
Face challenges head-on with these handy troubleshooting tips:
- Check Stability: If the extended island shakes, reinforce connections.
- Reevaluate Attach Points: Ensure structural integrity by securing legs to solid anchor points.
- Adjust for Uneven Floors: Use furniture pads or shims to level the island.
- Sand Down Irregularities: For smooth finishes, sand any rough patches before painting or staining.
- Seek Professional Advice: When in doubt, consult experts for guidance.
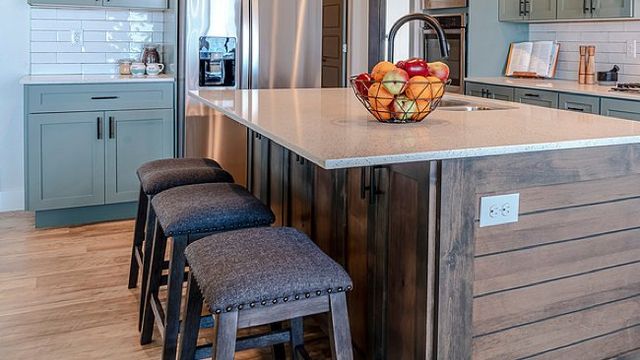
Real-life Examples
Kitchen islands are the heart of culinary creativity and social interaction in many homes. For those seeking inspiration, real-life examples offer valuable insights. These transformations reveal the potential for space and style optimization when extending kitchen islands with legs.
Before And After Kitchen Island Transformations
Witnessing a kitchen go from bland to grand is nothing short of inspiring. Extending a kitchen island not only provides additional counter space but also enhances the overall aesthetics. Below, find examples that showcase the profound impact of this home improvement.
| Before | After |
|---|---|
| Crammed cooking area | Spacious layout with extended island |
| Limited seating | Ample seating with stylish legs |
| Outdated design | Modern look with elegant legs |
Inspirational Ideas From Real Homeowners
Real homeowners have unleashed their creativity to revitalize their kitchen spaces. The result is an array of practical, yet sophisticated island extensions.
- Rustic charm: Using reclaimed wood legs to support the counter.
- Industrial edge: Incorporating metal legs for a modern feel.
- Classic elegance: Adding turned wood legs for a timeless look.
- Custom designs: Homeowners crafting unique legs to match their decor.
The options are endless and can be tailored to reflect personal style and requirements. Let these homeowner transformations guide and energize your next project.

Credit: www.tablelegs.com
Frequently Asked Questions For How To Extend Kitchen Island With Legs
How Can I Make My Kitchen Island Longer?
To extend your kitchen island, consider adding a butcher block, a drop-leaf extension, or a pull-out table. Alternatively, attach a new section of countertop with supporting legs for additional length. Always ensure stability and cohesion with the existing structure.
Can You Add Legs To An Island?
Yes, you can add legs to an island for additional support or to change its height and style. Ensure compatibility with the island’s design and structure for stability.
How Do I Increase My Kitchen Island Seat?
To increase seating at your kitchen island, consider adding a drop leaf extension, choosing a larger island, upgrading to a wider counter, or incorporating an adjacent dining area. Installing pull-out benches or stools can also maximize seating capacity.
How Do You Attach Kitchen Island Legs To Floor?
Secure kitchen island legs by first bolting a metal bracket or plate to the leg’s top. Then, anchor this bracket to the floor using appropriate screws or bolts that suit your flooring material, ensuring a stable and firm installation.
Conclusion
Extending your kitchen island with legs is a clever move, for both function and flair. By following the steps outlined, homeowners can achieve a stylish, yet practical, kitchen upgrade. Embrace this guide and watch your kitchen space transform, leaving guests in awe at the elegance of your craftsmanship.


