To fix a shower pan leak, first identify the source of leakage and then either seal it with a repair kit or replace the pan entirely. A shower pan leak can cause substantial damage if not addressed promptly.
Experiencing a shower pan leak can be a homeowner’s nightmare, leading to costly water damage and mold growth. Understanding the steps to diagnose and remedy this issue is crucial for maintaining a healthy bathroom environment. Dealing with a leak involves inspecting the shower pan for cracks or gaps, patching up minor issues, or undertaking a complete replacement for more severe damage.
Our guide aims to empower homeowners with practical tips to tackle leaks, ensuring they can protect their bathroom from water-related issues efficiently. With the right approach, fixing a shower pan leak is a manageable task that can restore the integrity of your shower area and prevent further complications.

Credit: www.cpcproducts.com.au
Identifying The Leak
A shower pan leak can lead to significant water damage in your bathroom. Spotting the source early is key to preventing costly repairs. Begin with a thorough inspection to pinpoint the area where water may be escaping.
Visual Inspection Troubleshooting
Start by visually inspecting the shower pan and surrounding areas. Look for obvious signs of leaking like standing water, or stains on the ceiling below. Check for cracks or gaps in the caulking and tile grout. Sometimes, these visual clues are enough to detect the problem.
Water Test For Shower Pan Integrity
For a more precise diagnosis, conduct a water test. Block the drain using a plug or tape to ensure water stays in the pan. Fill the shower base with colored water to make the leak easier to spot. Wait and watch for any water escaping to identify weak spots or holes.
- Remove all items from the shower area.
- Block the drain to keep water contained.
- Fill the shower pan with one to two inches of water.
- Watch for leaks emerging from the pan’s base or walls.
| Step | Action | Check for |
|---|---|---|
| 1 | Block the drain | Drain seal integrity |
| 2 | Fill the pan | Water seepage |
| 3 | Observe | Escape points |
Document any leakage with photos. This can be helpful when consulting a professional for repairs.
Preparation Before Repair
Before repairing a leak in your shower pan, proper preparation is essential. This step sets the stage for a successful fix, ensuring the repair lasts and prevents future leaks. Getting your workspace ready involves two key actions: collecting all the tools and materials you’ll need and making sure the area is safe for work.
Gathering Necessary Tools And Materials
Having the right tools and materials on hand is crucial. Start by making a checklist. Here’s what you typically need:
- Wrenches and screwdrivers to remove any fixtures.
- A caulk gun for applying sealant.
- Sealant designed for bathroom use to ensure it’s water-resistant.
- Replacement tiles or a shower pan liner, depending on the severity of the leak.
- Protective gear like gloves and safety glasses.
- Clean rags or sponges for cleanup.
Securing The Work Area
Keep your work area safe to avoid injuries and further damage. Follow these steps:
- Remove all personal items and toiletries from the shower.
- Lay down drop cloths or old towels to protect the floor.
- Turn off the water supply to prevent any unwanted spills.
- Ensure good ventilation by opening windows or using a fan.
Sealing Cracks And Gaps
A leaky shower pan can cause significant damage to your bathroom. Over time, small cracks and gaps may develop. These issues can lead to water leaks. To fix them, you need to seal these cracks properly. With the right materials and a careful approach, you can create a watertight seal. This will protect your bathroom from further damage.
Applying The Sealant
Start by cleaning the area around the crack thoroughly. Any dirt or soap scum can prevent a good seal. Let the area dry completely. Choose a high-quality sealant designed for bathrooms. It should be waterproof and mold-resistant.
- Cut the sealant’s tip at a 45-degree angle.
- Use a caulk gun for a steady application.
- Apply the sealant directly into the crack or gap.
- Smooth the sealant with a caulking tool or your finger.
Ensuring A Watertight Seal
After applying the sealant, it’s vital to ensure a tight seal. Use a damp cloth to remove any excess sealant. Check the edges to make sure they are smooth. Let the sealant cure as per the manufacturer’s instructions. Usually, this takes 24-48 hours.
| Step | Action |
|---|---|
| 1 | Inspect the sealant line for gaps or bubbles. |
| 2 | Press down lightly to remove air and ensure contact. |
| 3 | Wait for the full cure time before using the shower. |

Credit: waterstopsolutions.com.au
Fixing Tile And Grout Issues
Leaky shower pans often stem from compromised tiles and grout. Moisture can seep through cracks, causing damage. Fixing these issues can restore the integrity of a shower pan. This section guides you through the process, step by step.
Removing Damaged Tiles
Preparation and safety are key when removing damaged tiles. Follow these steps:
- Wear safety goggles and gloves to protect yourself.
- Use a grout saw to cut around the affected tiles.
- Leverage a chisel and hammer to gently remove the pieces.
- Clean the area thoroughly, removing any adhesive residue.
Grout Application Techniques
With the area prepped, applying new grout is crucial.
- Mix grout according to the manufacturer’s instructions. Consistency is vital.
- Use a grout float to apply grout, pressing firmly.
- Fill all gaps, ensuring a smooth, even surface.
- Wipe away excessive grout with a damp sponge.
- Let it dry, then apply a sealant for extra protection.
Curing And Testing Post-repair
Fixing a shower pan leak requires patience and precision. Once you’ve applied the new sealant, the repair job isn’t finished just yet. It’s essential to allow ample curing time for the sealant and perform a thorough re-test to ensure no water escapes. Let’s delve into the vital steps of curing and testing post-repair.
Curing Time For Different Sealants
Different sealants have varied curing times. It’s crucial to follow the manufacturer’s guidelines here. For a general understanding, consult this table:
| Sealant Type | Curing Time |
|---|---|
| Silicone | 24-48 hours |
| Acrylic | 12-24 hours |
| Polyurethane | 48-72 hours |
Check the product label for exact curing times. Stick to these time frames to avoid any leak recurrence.
Re-testing Shower Pan For Leaks
After the cure period, testing the shower pan ensures the leak is fixed. Here are the steps:
- Block the drain with a test plug.
- Fill the shower base with water up to the threshold mark.
- Mark the water level with tape.
- Wait for 8 hours or as recommended.
- Check if the water level drops.
If the water level stays constant, your repair is successful. A drop in the water level indicates a persisting leak.
The key to shower pan repair lies in the wait and check approach. Give your sealant time to set and make sure your work holds up under scrutiny. With these steps followed diligently, you can enjoy a leak-free shower once more.

Credit: www.wondercap.com
Maintenance To Prevent Future Leaks
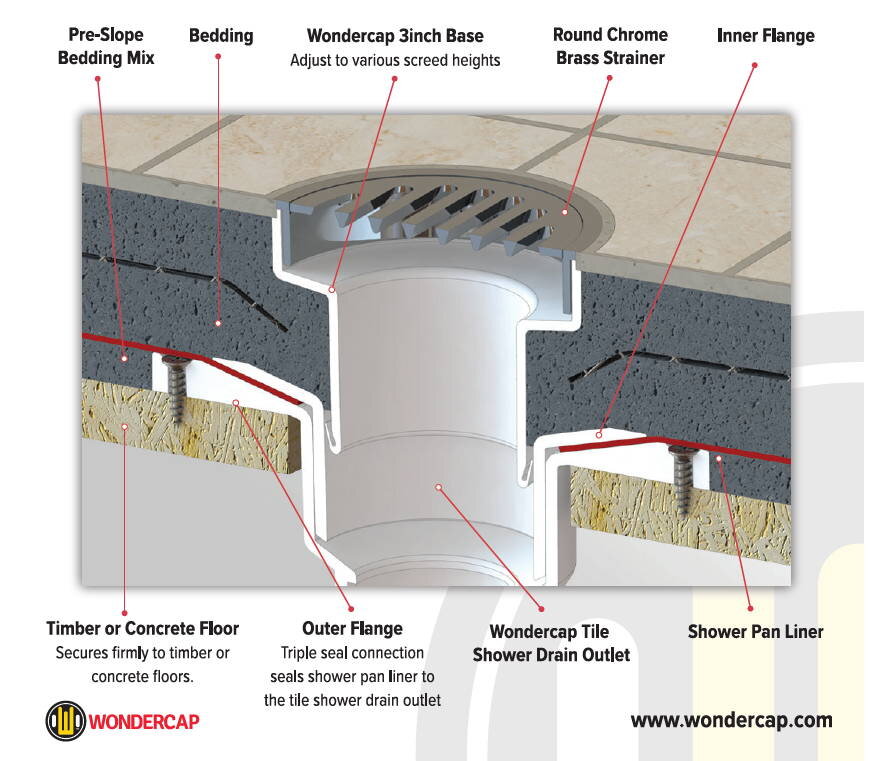
Shower pans are crucial in keeping bathroom floors dry and mold-free. Yet, over time, they may develop leaks. Regular maintenance is essential to prevent this issue. Consistent inspections and preventive care extend the life of your shower pan.
Routine Check-ups
Every few months, take time to inspect your shower pan for signs of wear. Look for cracks, especially around the drain and edges. Staining can also indicate an underlying leak. Checking caulk and sealant regularly prevents water damage. Replace any deteriorated caulk immediately.
- Inspect drain and edges for cracks
- Look for staining on the pan
- Check for deteriorated caulk or sealant
- Replace faulty components without delay
Preventive Measures
Prevention is better than cure. Apply a waterproof sealant annually to avoid leaks. Sealants keep the pan watertight. Ensure the shower drain is not clogged. A clogged drain can lead to standing water, causing stress on the pan.
| Action | Purpose |
|---|---|
| Apply waterproof sealant | Waterproofing the pan |
| Regular drain cleaning | Preventing standing water |
- Apply sealant
- Clean drains regularly
- Conduct professional inspections
- Use non-abrasive cleaners
Consider professional inspections every few years. Professionals can spot potential issues you may miss. Also, clean your shower with non-abrasive cleaners. These cleaners protect the pan’s surface and sealant.
Frequently Asked Questions For How To Fix A Shower Pan Leak
Can A Diyer Fix A Shower Pan Leak?
Yes, a competent DIYer can fix a shower pan leak. However, it requires proper identification of the leak source, the right materials, and a basic understanding of plumbing. Without experience, consider consulting a professional to avoid further damage.
What Are Signs Of A Leaking Shower Pan?
Signs of a leaking shower pan include water stains on the ceiling below, mold or mildew growth, loose tiles, or a musty odor. Persistent moisture in the area indicates a potential leak that needs attention.
How Long Does A Shower Pan Last Before Leaking?
A well-installed shower pan can last up to 30 years. However, its lifespan can be shorter if not installed properly or due to poor maintenance. Regular inspections can prevent unexpected leaks and extend the pan’s life.
What Materials Are Needed To Repair A Shower Pan Leak?
Materials needed typically include a new shower pan liner, sealant, and potentially new tiles or grout. Exact materials depend on the type and extent of the damage and whether a full replacement or a patch is necessary.
Conclusion
Repairing a shower pan leak is essential to protect your home from water damage. Step-by-step guidance ensures DIY success and saves on costly repairs. Remember to assess the damage, gather the right tools, and seal the leak with precision. With these tips, your shower pan should be as good as new, keeping moisture where it belongs.
Take action now and enjoy a leak-free bathroom!


