To install a Delta shower valve rough-in, first shut off the water supply and assemble the required tools. Next, follow the manufacturer’s instructions for positioning and securing the valve.
Embarking on a bathroom renovation or simply updating your shower setup can be an exciting venture. Installing a Delta shower valve rough-in is a crucial step that paves the way for optimal water flow and temperature control in your new shower.
Whether you’re an experienced DIY enthusiast or a first-timer willing to tackle plumbing tasks, understanding the installation process is key to a successful outcome. Precise handling and adherence to guidelines ensure your shower’s performance and longevity, all while avoiding potential leaks or plumbing mishaps. Equipped with a comprehensive manual and a clear understanding of the task at hand, you can confidently install the shower valve, laying the foundation for your bathroom’s enhanced functionality.
Intro To Delta Shower Valve Installation
Upgrading your shower with a new Delta valve adds comfort and control to your daily routine. Proper installation ensures a leak-free experience and smooth operation. Learn the essentials here and get ready for a refreshing start!
Importance Of Correct Installation
Getting your Delta shower valve installed correctly is vital for optimal performance. It prevents water damage and ensures reliable functionality. A precise install maintains the manufacturer’s warranty and gives you peace of mind.
Tools Required For The Job
Before you begin, gather these essential tools for a smooth installation process:
- Adjustable wrench
- Screwdrivers (Phillips and flat-head)
- Teflon tape
- Pipe cutter or hacksaw
- Soldering iron and lead-free solder
- Tape measure
- Pipe wrench
- Plumber’s putty
Pre-installation Steps
Preparing for a new Delta shower valve installation is crucial. Proper steps ensure a smooth process and prevent issues. Follow these key pre-installation measures for the best results.
Shut Off The Water Supply
Before starting, turn off the main water to your home. This prevents water from flooding your work area. Confirm the water is off by turning on a faucet at a lower level than your shower.
Choose The Right Valve Model
Delta offers various valve models. Choose one that fits your specific shower setup and requirements. Consider features like MultiChoice Universal for versatile upgrades later.
Understanding The Plumbing Layout
- Locate studs in the wall where the valve mounts.
- Ensure there’s enough space for the valve and future maintenance.
- Measure distances between supply lines and valve placement.
Reviewing the plumbing layout helps anticipate adjustments. Good knowledge of this layout aids in a successful installation.
Preparing The Workspace
Starting a DIY project to install a Delta shower valve rough-in begins with a crucial step: preparing the workspace. A well-prepared area ensures safety and accuracy. The aim is to protect your bathroom surfaces and establish clear, precise markings for the new valve placement. Keep reading to learn the details of how to prepare like a pro!
Protecting The Surrounding Area
Before diving into the installation, safeguard your bathroom’s beauty. Your tiles, tub, and floors need protection from potential scratches or debris. Follow these steps:
- Cover the tub with a drop cloth to prevent scratches.
- Use duct tape to secure the cloth, ensuring it doesn’t slip.
- Surface surrounding the work area should get covered in plastic sheeting.
This keeps your workspace safe, clean, and ready for the next step.
Measuring And Marking For Precision
Precision is key for a successful valve installation. Measure twice, cut once, as the adage goes. Here’s what to do:
- Find the manufacturer’s installation guide. It shows where to place the valve.
- Grab a level and pencil. Use them to draw straight, level lines on the wall stud where the valve will go.
- Measure the distances specified in the manual, marking them on the stud.
- Ensure the marks align with the desired valve height and wall depth.
Correct measurements keep the installation process smooth and error-free. Now, you’re set to tackle the actual installation with confidence!

Credit: m.youtube.com
Installation Process
The installation of a Delta shower valve rough-in is a rewarding DIY project. With the right tools and instructions, this task ensures efficient water flow and temperature control for your shower. Let’s explore the installation process in detail.
Mounting The Valve Body
First, you need a solid backing to mount the valve body. Make sure the area is clean and dry. Follow these steps:
- Measure the distance between the faucet and showerhead for correct placement.
- Mark the position of the rough-in valve on the backing material.
- Drill holes for mounting screws.
- Attach the valve using the provided screws, ensuring it’s level.
Connecting The Water Supply Lines
Next, connect the water supply lines. Use this systematic approach:
- Turn off your home’s water supply.
- Cut pipes to the appropriate length.
- Apply plumber’s tape on the threads for a waterproof seal.
- Secure the hot and cold water lines to the valve inlets.
Securing And Sealing Connections
Finally, focus on securing and sealing all connections. Here’s what you should do:
- Check all connections for tightness.
- Seal around the valve with silicon caulk to prevent leaks.
- Cover the valve with a trim plate for a neat finish.
- Allow the caulk to dry following the manufacturer’s instructions.
Final Touches
With your Delta shower valve rough-in securely in place, it’s now time for the final touches. This phase involves attaching the trim and handle and making sure everything works without leaks. This is where your new shower starts to take its final shape, looking as great as it functions. Let’s go through these last important steps to complete your installation.
Attaching Trim And Handle
First, let’s focus on making your shower look amazing. Your Delta shower trim kit includes all the necessary pieces to do just that.
- Align the trim plate with the valve and secure it.
- Ensure all the seals are in place to prevent water from getting behind your walls.
- Attach the handle with the screws provided but don’t over-tighten, to avoid damage.
Peek at your manual for detailed graphics or diagrams to help with this part. Your trim should now be flush against the wall and the handle set in place, turning smoothly.
Testing For Leaks And Functionality
The last thing anyone wants is a leak after the install. It’s time to thoroughly test.
- Turn on the water supply and watch for drips around the valve.
- Operate the handle, checking for smooth control over both temperature and water flow.
- Take note of any unusual noises or water pressure issues.
In case of leaks, shut off the water and tighten any loose connections. Double-check all parts to confirm proper installation. Once it’s all clear, your new Delta shower is ready for use!
Troubleshooting Common Issues
Installing a Delta shower valve rough-in can hit snags, like low water pressure or wonky water temperatures. No need to stress. This guide will lead you through quick fixes to get your shower running right.
Dealing with Low Water Pressure
Dealing With Low Water Pressure
Sometimes after installation, your shower’s water pressure doesn’t feel strong enough. Let’s fix that.
- Check your main water valve. Make sure it’s fully open.
- Inspect the shower valve for blockages. Look for debris or buildup.
- Test other fixtures. Are they also low on pressure?
- If it’s just the shower, the issue might be with the valve itself.
For valve troubleshooting:
- Turn off the water supply.
- Remove the valve handle and trim.
- Clean any debris from the valve body and cartridge.
- Inspect the cartridge. Replace it if necessary.
With blockages gone, restore the valve handle and trim. Test your shower again.
Adjusting Water Temperature
Adjusting Water Temperature
Getting the perfect water temperature is crucial for a great shower experience. Is your water too hot or too cold? Try these steps:
- Remove the shower handle.
- Locate the rotational limit stop. It’s a small part on the valve cartridge.
- To increase hot water, turn the limit stop counterclockwise.
- To decrease, turn it clockwise.
Adjust the limit stop incrementally. Each notch change can affect the temperature by 4 to 16 degrees Fahrenheit.
Remember to test the water before sealing everything back up.
If issues persist, valve replacement might be necessary. Follow the installation guide closely or seek professional help.
Maintenance Tips
Maintenance Tips for Your Delta Shower Valve Rough-In play a critical role in ensuring the longevity and performance of your shower setup. Regular attention is vital to keep it functioning smoothly. Follow these guidelines to maintain optimal performance.
Routine Cleaning And Inspection
Basic upkeep is essential for a well-performing shower valve. Here’s what you should do:
- Regularly wipe the valve’s exterior with a soft cloth.
- Use mild soap and water for cleaning; avoid harsh chemicals.
- Inspect for leaks or corrosion. Check connections to ensure they are tight.
- Operate the valve handle to ensure smooth movement.
Twice a year, do a deeper inspection:
- Turn off the water supply.
- Remove the handle and trim pieces.
- Clean internal components with a damp cloth.
- Lubricate moving parts with silicone grease.
- Reassemble the valve and restore water supply.
When To Call A Professional
Some situations require expert intervention. Reach out to a professional:
- When leaks persist after tightening connections.
- If there’s a consistent drop in water pressure.
- In case of strange noises coming from the valve.
- When you can’t fully rotate the valve handle.
Professionals will diagnose issues, provide repairs, or suggest replacements if necessary. Act promptly to avoid further damage.

Credit: www.deltafaucet.com

Credit: m.youtube.com
Frequently Asked Questions For How To Install Delta Shower Valve Rough In
How To Install A Delta Shower Control Valve?
Turn off the water supply and ensure the area is dry. Mount the valve to a sturdy backing. Connect the water lines to the valve as per manufacturer’s instructions. Secure the valve body with appropriate fittings. Once installed, test for leaks before closing the wall.
What Is The Rough In Height For A Shower Valve?
The standard rough-in height for a shower valve is between 38 and 48 inches above the floor.
How Big Of A Hole Do You Need To Drill For A Delta Shower Valve?
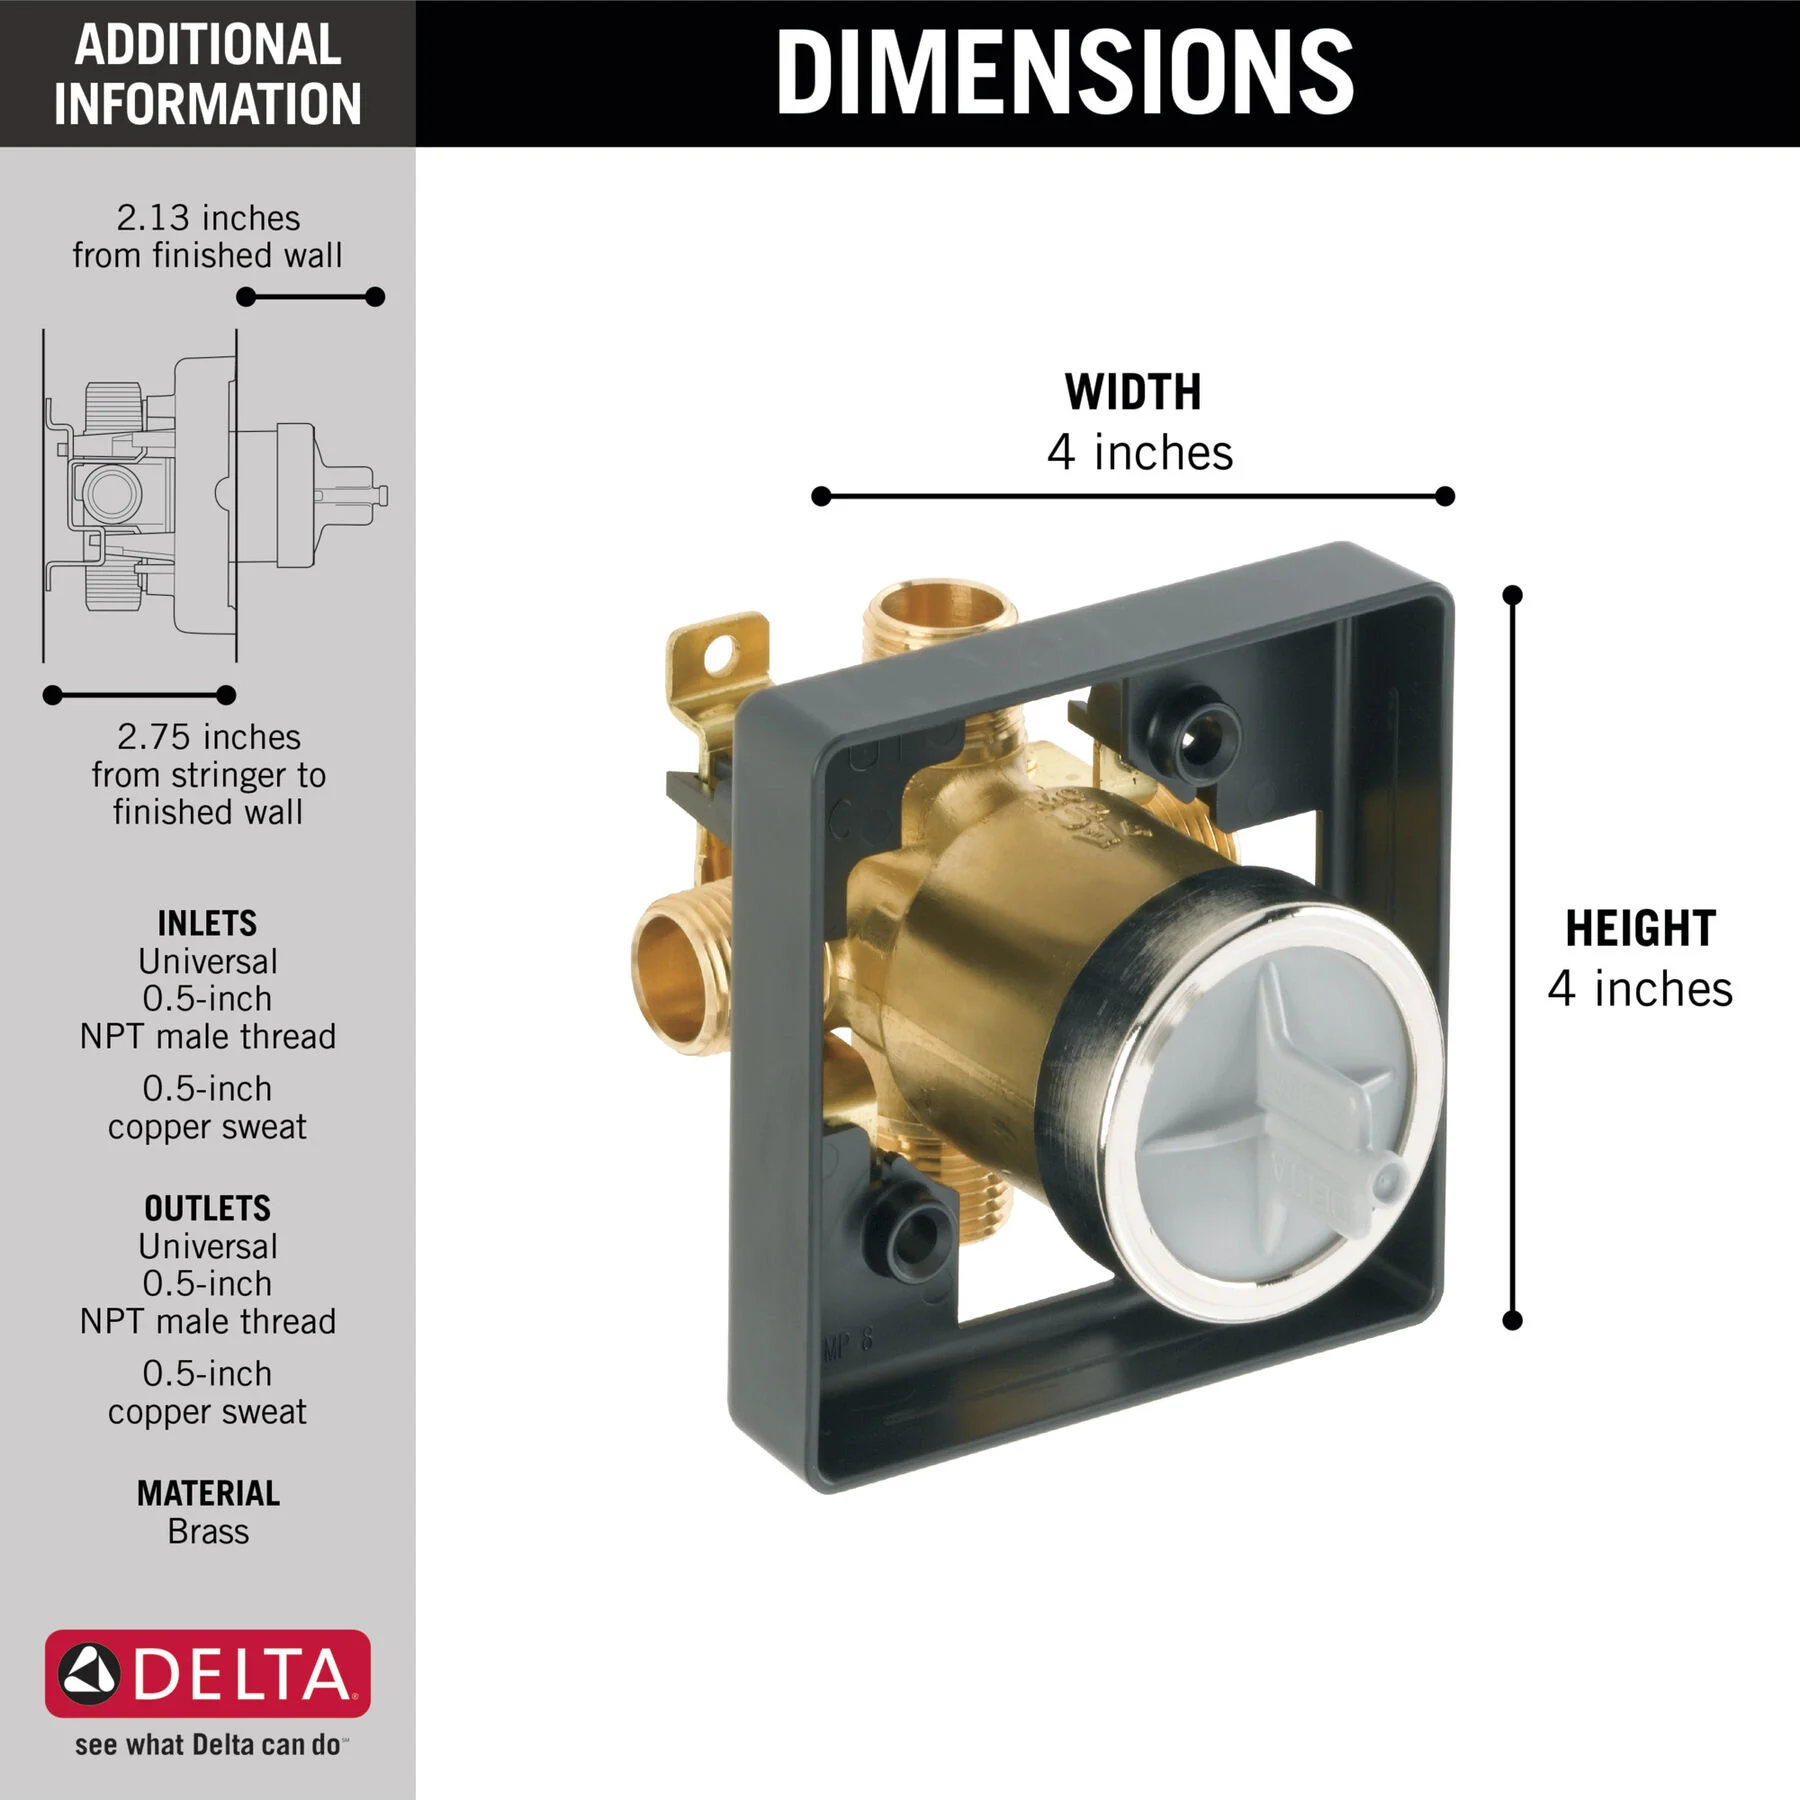
For a Delta shower valve, you need to drill a hole that is approximately 4 inches wide. Always refer to the specific model’s installation instructions for precise requirements.
What Are Stops On A Rough In Shower Valve?
Stops on a rough-in shower valve allow water flow to be shut off directly at the valve for maintenance without affecting the home’s main water supply.
Conclusion
Wrapping up your Delta shower valve rough-in installation can be a straightforward task with the right tools and guidance. Remember to double-check all connections for leaks before sealing up the wall. With this step-by-step guide, your DIY plumbing project should now be complete, leaving you with a fully functional shower ready to deliver a refreshing experience.
Always consult a professional if you encounter any issues during installation.


